Embroidery Floss Organizer Laser Cut: A Practical Guide to Building Better Craft Storage
There is a distinct satisfaction in watching a chaotic collection of embroidery threads transform into a neat, accessible display. An Embroidery Floss Organizer Laser Cut design offers exactly this transformation, turning raw wood into a functional piece of art that keeps your supplies within reach. Whether you are managing a small home studio or running a business selling handmade goods, the ability to organize bobbin holders and decorative storage bases efficiently can change how you approach your needlework projects. However, simply downloading a file and hitting "cut" rarely yields the best results. Many crafters overlook critical details regarding material selection, software compatibility, and assembly techniques, leading to frustration rather than organization.
Understanding the Value of Custom Laser Cut Organization
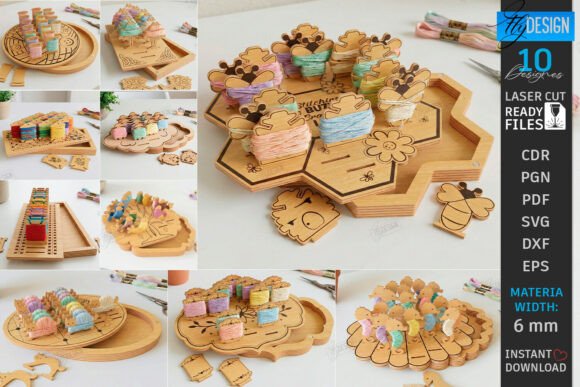
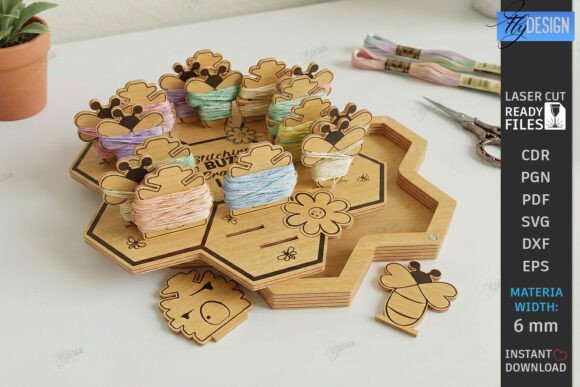
The appeal of an Embroidery Floss Organizer Laser Cut project lies in its customizability and structural integrity. Unlike mass-produced plastic bins, these organizers feature layered construction that creates a sturdy base capable of holding significant weight without warping. The design typically includes removable bobbin holders, allowing you to swap out sections as your thread inventory changes, and a dedicated small compartment for needles, scissors, and other accessories. This modularity is essential for cross-stitch enthusiasts who need quick access to specific colors without tangling their floss.
Beyond mere utility, these designs serve as elegant decor. When crafted from high-quality hardwood or plywood, the finished piece complements any crafting space. The laser engraving capabilities allow for personalized touches, making it a thoughtful gift for embroidery lovers. Yet, the transition from digital file to physical object requires more than just owning a Glowforge or xTool machine. It demands a strategic approach to ensure the final product is durable and aesthetically pleasing.
Common Pitfalls in Material Selection
One of the most frequent mistakes makers encounter is choosing the wrong type of wood for the job. While the design files often state they work with plywood, hardwood, or MDF, not all materials behave the same way under a laser beam. Using low-grade plywood with voids or inconsistent glue lines can result in burnt-through spots or weak joints that fail when loaded with heavy spools of thread. Similarly, some MDF varieties contain excessive urea-formaldehyde glue, which can discolor the wood or produce toxic fumes during cutting if the ventilation is not adequate.
To avoid these issues, prioritize Baltic birch plywood for projects requiring visible edges and durability. Its consistent layers and lack of voids ensure clean cuts and strong interlocking joints. If you prefer a smoother finish for painting, choose fine-grain hardwood like maple or cherry, but be prepared to adjust your power settings to prevent charring. Always test your settings on a scrap piece of the exact material you intend to use. This simple step prevents wasted time and expensive materials, ensuring the final organizer looks professional rather than amateurish.
Navigating Software and Machine Compatibility
Another area where creators often stumble is assuming that a design file will work seamlessly across all laser cutting machines. Just because a file is labeled for "Laser Cutting Machines" does not mean it is ready for your specific setup. Files designed for Glowforge may have different kerf compensation requirements compared to those intended for xTool or CO2 lasers. Ignoring these nuances can lead to parts that are too tight to assemble or so loose that the structure collapses.
Before purchasing or downloading an Embroidery Floss Organizer Laser Cut bundle, verify the file format and layer information. Ensure the software you use, such as LightBurn or the manufacturer's proprietary app, can interpret the vector paths correctly. Pay close attention to the line weights; thin lines intended for engraving might be cut through by mistake if the power settings are too high. Conversely, thick lines meant for cutting might only score the surface if the power is too low. Taking the time to calibrate your machine ensures that the peg holes fit perfectly and the decorative engraved covers sit flush against the board.
Assembly Techniques That Ensure Longevity
The beauty of a laser-cut organizer is in its joinery, but poor assembly can undermine even the best design. A common oversight is relying solely on friction fits without reinforcement. While laser-cut slots are designed to snap together, the constant removal and insertion of bobbin holders can wear down the wood over time, causing the organizer to become wobbly. Additionally, neglecting to sand the edges before assembly can leave rough surfaces that snag delicate embroidery floss, defeating the purpose of the organizer.
A better approach involves light sanding of all internal slots and external edges immediately after cutting. Use a fine-grit sandpaper to smooth out any charred residue, then apply a clear sealant or oil to protect the wood from humidity and handling. For added stability, consider using a drop of wood glue in the primary structural joints before snapping them together. This hybrid method combines the speed of friction fitting with the permanence of glued joints, resulting in a storage solution that withstands years of daily use.
Evaluating Designs Before You Buy
When browsing for an Embroidery Floss Organizer Laser Cut design, look beyond the preview images. Examine the technical specifications provided by the seller. Does the design account for the thickness of your specific material? Many generic designs assume a standard 3mm or 6mm thickness, which may not match the stock you have on hand. If the slot depth is incorrect, the bobbin holders will either fall out or refuse to slide in.
Furthermore, check if the design includes scalable options. Your workspace may require a larger footprint than the standard size, or you might want to create a smaller version for travel kits. Flexible designs that allow for easy resizing without distorting the proportions are far more valuable. Also, consider the versatility of the layout. Does the small compartment for tools accommodate your specific set of scissors and thimbles? A well-thought-out design anticipates these user needs, whereas a poorly planned one forces you to compromise on functionality.
Creating Versatile Projects for Hobbyists and Businesses
While the primary focus is often on organizing threads, the skills learned here translate beautifully to other projects, such as creating a wooden cribbage board game. The same principles of precise cutting, careful material selection, and thoughtful assembly apply. By mastering the nuances of laser cutting for storage, you gain the confidence to tackle complex tabletop games with decorative engraved covers inspired by nature themes. These projects not only serve as unique gifts but also open doors for small businesses looking to sell high-quality handmade goods.
Ultimately, the goal is to create something that enhances your creative process rather than hindering it. By avoiding common mistakes in material choice, software configuration, and assembly, you ensure that your Embroidery Floss Organizer Laser Cut becomes a reliable companion in your crafting journey. Take the time to plan, test, and refine your approach, and you will end up with a beautiful, functional piece that brings order to your creativity.