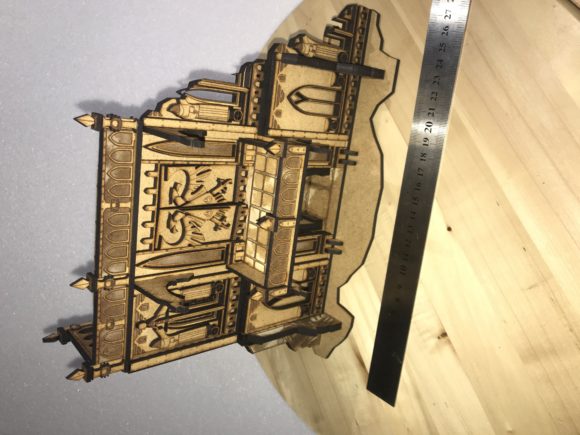
Bringing the Dark Ages to Life: The Gothic Temple Ruins Part 1 Entrance for Tabletop Gaming
In the realm of tabletop wargaming, the battlefield is only as compelling as the terrain that defines it. Whether you are commanding Space Marines through the grim darkness of the far future or leading a party of adventurers into a cursed dungeon, the physical environment dictates the flow of combat and the immersion of the narrative. For hobbyists looking to elevate their gaming tables without spending weeks on intricate modeling, digital laser-cut templates have become an essential tool. Among these, the Gothic Temple Ruins Part 1 Entrance stands out as a versatile, atmospheric, and highly functional piece designed specifically for modern makers.
This specific design offers a perfect entry point into the world of custom terrain. It is not merely a flat sheet of plastic or wood; it is a carefully engineered blueprint ready to be transformed into a three-dimensional structure. By leveraging digital fabrication technology, creators can produce high-quality ruins in hours rather than days. This article explores how this specific SVG file fits into your workflow, the technical specifications required for a successful cut, and why it has become a favorite for Warhammer 40k and Dungeons & Dragons enthusiasts alike.
The Atmosphere of the Entrance
The visual impact of a game board often hinges on its focal points. An entrance serves as a gateway, literally and figuratively, inviting players to step into a new zone of conflict or exploration. The Gothic Temple Ruins Part 1 Entrance captures the essence of decayed grandeur. With its arches, crumbling masonry, and shadowed recesses, it evokes a sense of history and mystery that is crucial for gothic-fantasy settings.
For Warhammer 40k players, this structure provides the perfect cover for a squad of Orks raiding an ancient shrine or a group of Adeptus Mechanicus tech-priests scavenging forbidden data. The scale is optimized to sit comfortably within the standard 28mm miniatures ecosystem, ensuring that models do not look lost or disproportionately large. Similarly, for Dungeons & Dragons groups, this entrance acts as the threshold to a boss room or a hidden chamber, creating a natural choke point that forces tactical decision-making during combat encounters.
The design philosophy behind this ruin is rooted in "broken" architecture. Instead of pristine walls, the template features jagged edges and partial structures. This aesthetic choice does more than just look cool; it enhances gameplay by providing varied line-of-sight options. A model peeking around a broken pillar sees less than one standing in the open doorway, adding a layer of realism to the skirmish.
Technical Specifications and Dimensions
Understanding the physical constraints of your project is vital before hitting the print button. The Gothic Temple Ruins Part 1 Entrance is designed with precise dimensions to ensure stability and playability. Once assembled, the inner walls measure approximately 130x230x190mm. These dimensions are not arbitrary; they are calculated to fit standard gaming table layouts while remaining sturdy enough to withstand the bumps and knocks of an intense battle.
The design is delivered as a digital download in SVG format, created using Inkscape. This vector-based approach ensures that the lines remain crisp regardless of the scale at which they are viewed or cut. The layout is optimized for an A4 size sheet (300x200mm), making it incredibly efficient for home users who may not have access to industrial-sized cutting machines. You can maximize material usage by nesting multiple parts on a single sheet, reducing waste and cost per unit.
- File Format: SVG (Scalable Vector Graphics)
- Design Software: Inkscape
- Recommended Sheet Size: A4 (300x200mm)
- Final Inner Dimensions: 130x230x190mm
Mastering the Laser Cut Process
One of the most significant advantages of purchasing a digital template like the Gothic Temple Ruins Part 1 Entrance is the control it gives you over the manufacturing process. However, achieving a professional finish requires understanding how to interpret the color-coded layers within the SVG file. The design utilizes a three-color system to distinguish between different types of laser operations, a method widely supported by software like LightBurn or RDWorks.
The RED CUT lines indicate where the laser should fully penetrate the material to separate the pieces. This is the primary structural component of the ruin. Precision here is critical; if the kerf (the width of the cut) is too wide, the interlocking joints may be loose. If it is too narrow, the pieces might jam. Most hobbyists find that a slight adjustment to the power settings on their machine yields the best fit.
The BLUE VECTOR ENGRAVE lines are used for surface detailing. These lines create depth and texture without cutting all the way through. On a gothic temple, this might represent brickwork patterns, weathering cracks, or decorative carvings. The blue vectors add a level of sophistication that transforms a simple box into a textured ruin.
Finally, the BLACK ENGRAVE areas are reserved for shading or filling in larger sections to simulate shadow or heavy decay. This technique adds contrast and visual weight to the model, making the entrance appear darker and more foreboding right out of the box, even before painting begins.
Hardware Recommendations: The K40 Whisperer
While many laser engravers can handle this file, the K40 Whisperer 3 is frequently cited as the ideal companion for this specific project. Known for its reliability and ability to handle both cutting and engraving with precision, the K40 series is a staple in the maker community. Its 30W power output is sufficient to slice through the recommended materials cleanly, while the whisperer modification reduces noise and improves beam quality for finer details.
If you are working with a different machine, such as an xTool or Glowforge, the principles remain the same. The key is to calibrate your machine to the material thickness you choose. Since the design is intended for 3mm thickness, ensure your focus lens is set correctly and your bed is leveled. A misaligned bed can lead to uneven cuts, which will make assembling the Gothic Temple Ruins Part 1 Entrance frustrating and potentially ruin the aesthetic integrity of the final piece.
Choosing the Right Material
The longevity and appearance of your terrain depend heavily on the substrate you choose. The Gothic Temple Ruins Part 1 Entrance is compatible with a variety of materials, each offering distinct benefits depending on your budget and desired look.
MDF (Medium-Density Fiberboard) is the most popular choice for hobbyists. It cuts cleanly, sands easily, and takes paint exceptionally well. The uniform density of MDF means there are no grain lines to interfere with the laser's path, resulting in smooth edges. At 3mm thickness, MDF provides a good balance between rigidity and ease of handling. It is also affordable, allowing you to experiment with multiple copies of the entrance without breaking the bank.
Plywood offers a more rustic, organic feel. The natural grain of the wood can enhance the "ruined" aesthetic, especially if you plan to leave some areas unpainted or use washes to highlight the texture. Birch plywood is generally preferred over cheaper varieties because it burns less and produces cleaner edges. However, be aware that the grain can sometimes cause minor variations in the cut, requiring slightly more post-processing.
For those seeking a premium, translucent look, Acrylic is an excellent alternative. Acrylic allows light to pass through, which can be utilized for dramatic lighting effects. Imagine placing an LED strip behind the Gothic Temple Ruins Part 1 Entrance to create a glowing, ominous effect from within the ruins. Acrylic requires different cutting parameters—usually lower speed and higher power—to prevent melting, but the result is a sleek, modern ruin that stands out on any table.
Assembly and Integration
Once your pieces are cut, the assembly process is straightforward. The design typically includes tab-and-slot joints that snap together securely. Using a strong adhesive like PVA glue or CA (super glue) will lock the structure in place. Because the inner dimensions are fixed at 130x230x190mm, you can confidently build other modular pieces to connect with this entrance later, expanding your terrain library seamlessly.
Integration into your existing workflow is seamless. Many gamers keep a stock of pre-cut bases and terrain components. Having a digital file for the Gothic Temple Ruins Part 1 Entrance means you can reproduce it whenever you need a replacement or want to expand your collection. This scalability is a major advantage over buying pre-made resin or foam kits, which often come in limited quantities and at a higher price point.
Whether you are setting up a tournament table or hosting a casual Friday night session, the ability to quickly deploy a high-quality, thematic structure changes the dynamic of the game. It encourages movement, creates strategic dilemmas, and most importantly, sparks the imagination of everyone at the table. The Gothic Temple Ruins Part 1 Entrance is more than just a download; it is the foundation for countless memorable battles and adventures waiting to unfold.